Thursday 8 June 2017

Portrait Analysis

Portrait Analysis  
                                                                                 
Find a portrait and write an analysis of it. Include both the photo as well as your analysis in the same printed document. DO NOT ANSWER THESE LIKE QUESTIONS, INSTEAD ANSWER ALL IN A PARAGRAPH.
1.      As we have done before, discuss the following controls in detail: subject, background, lighting, angle, framing and focus.
2.      Discuss 2 of the elements and 2 of the principles of design.
3.      What is the person like? What is revealed about the person in this portrait?
4.      How have the controls been used specifically to express the subject’s personality?
Your analysis should be approximately one page in length - typed, double spaced (250+ words).
Limited analysis, all questions from above have been answered and student shows limited understanding of Elements, Principles, Controls and Portrait.
Somewhat detailed analysis, all questions from above have been answered and student shows some understanding of Elements, Principles, Controls and Portrait.
Mostly detailed analysis, all questions from above have been answered and student shows good understanding of Elements, Principles, Controls and Portrait.
Highly detailed analysis, all questions from above have been answered and student shows strong understanding of Elements, Principles, Controls and Portrait.
7.5         8.3
9         9.8
10.5     11.3
12        13.5       15


Monday 29 May 2017

MARKS AND LATES

Hi Folks,
As of yesterday I have updated all your marks. Anything that you submit from now on must be submitted by email. I will not check your website again this semester so if you need me to look at something posted there you must email me the link to the assignment.
Today I will hand back all work and I will hand out lists of missing assignments to everyone. If you lose this list you can find a list of all assignments further down the blog.
It would be smart to prioritize finishing the assignments that are worth the most marks over those worth only 2 or 5 marks.
Once you complete a late assignment you must email me the link or hand it in to me directly (depending on how it was required in the first place).
ALL LATE WORK MUST BE IN NO LATER THAN FRIDAY, JUNE 16TH.
NO EXCEPTIONS!


Thursday 25 May 2017

Catching UP

Here is a checklist of items to catch-up on since mid-terms, all of which need to be posted on your blog and then YOU MUST EMAIL ME THE LINK TO FIND THE FINISHED WORK:
-Photoshop Techniques on Elephant = 2 marks
-Negative Space and Fill the Frame Portfolio (10 images total) = 30 marks
-Digital Celebrity = 10 marks
-Background Switch = 10 marks
-Shutter Speed Portfolio (10 images total) = 10 marks
-Enhance 3 of your own photographs in Photoshop and post the before and after images Click Here = 2 marks each enhancement
-Digital Manipulation opinion response = 5 marks
-Pattern and Texture Portfolio = 40 marks
-SLR Portfolio contact sheet and glossy BEST printed (handout) = 30 marks
-Variations and Transformations Photoshop (handout) = 10 marks (or do more for bonus marks!)
-Blend Mode on Photoshop (handout) = 5 marks (or do more for bonus marks!)
-Float, Blur and Emphasis Project (handout)

Monday 8 May 2017

TEST REVIEW

What is covered on the test?
-Controls (lighting)
-Elements (shape)
-Principles (contrast)
-4 types of framing (close-up)
-3 different angles (high angle, eye level, low angle)
-Purposes of Photography (to control, to advertise, to inform, to educate, to entertain)
-Rule of Thirds
-Light Facts (straight lines, bounces)
-Pinhole Camera (how big the box is, length of shutter opening, how large the pinhole is)
-Processing Photographic Paper (developer bath = develops, stop bath = stops the developer)
-Photograph Analysis
-Parts of the SLR Camera (shutter, mirror, aperture lens, viewfinder, etc.)
-Photographic Controls (aperture, shutter speed, ISO)
-Shutter Speed
-Aperture
-ISO

What is the format of the test?
-matching
-labeling diagrams
-multiple choice
-short answer (listing)
-long answer

Catching UP

Here is a checklist of items to catch-up on since mid-terms, all of which need to be posted on your blog:
-Photoshop Techniques on Elephant = 2 marks
-Negative Space and Fill the Frame Portfolio (10 images total) = 30 marks
-Digital Celebrity = 10 marks
-Background Switch = 10 marks
-Shutter Speed Portfolio (20 images total) = 10 marks
-Enhance 3 of your own photographs in Photoshop and post the before and after images Click Here = 2 marks each enhancement
-Digital Manipulation opinion response = 5 marks
-Pattern and Texture Portfolio = 40 marks
-SLR Portfolio contact sheet and glossy BEST printed


If you have everything complete you should be studying for the test on Wednesday.

Pattern and Texture Portfolio


RUBRIC for Pattern and Texture Portfolio
       Criteria
Level 1
Level 2
Level 3
Level 4
Knowledge/Understanding
Quality of photo:
-value range is balanced (not over or underexposed lighting)
-dynamic photographs
-subject is in focus            /10
Limited quality: limited value range and many unfocused subjects

5     5.5
Somewhat good quality: some value range, some subjects are focused

6     6.5
Good quality: most photos have:   full range of values from light to dark, and   subjects are mostly in focus
7     7.5
Great quality: full range of values from dark to light, all subjects are in focus

8     9    10
Thinking/ Inquiry
Patterns and Textures
-accurate depiction of composition techniques
                    /10
Check the examples again. 5/10 accurately depict pattern and/or 5/10 accurately depict texture
5      5.5
Check the examples again. 6/10 accurately depict pattern and 6/10 accurately depict texture.
6      6.5
Good start! 7-8/10 accurately depict pattern and 7-8/10 accurately depict   textures.

7       7.5
Nailed it! 8-10/10 accurately depict pattern and 8-10/10 accurately depict textures.
8   9    10
Communication
Blog Post:
-each photograph is labeled with the photographic controls
-each photograph’s subject is identified
-blog post is titled appropriately                       /5
Composition techniques and subjects are rarely labeled accurately. Blog post has appropriate title.
5      5.5
Composition techniques and subjects are sometimes labeled accurately. Blog post has appropriate title.
6      6.5
Composition techniques and subjects are mostly labeled accurately. Blog post has appropriate title.

7       7.5
Composition technique and subject is labeled accurately. Blog post has appropriate title.
8   9    10 
Application
Exploration and creativity:
-variety of angles, locations, subject matter, camera rotation
-variety of textures and patterns
-ordinary objects have been transformed into interesting photographs                       /10
Limited exploration and creativity: little variety of shots, little variety  angles, locations, subject matter, camera rotation.
Ordinary objects have been transformed into interesting photographs rarely
5     5.5
Some exploration and creativity: some variety  angles, locations, subject matter, camera rotation.
Ordinary objects have been transformed into interesting photographs sometimes.

6    6.5
Good exploration and creativity: a good variety of  angles, locations, subject matter, camera rotation.
Ordinary objects have been transformed into interesting photographs mostly.

7     7.5
Great exploration and highly creative portfolio: variety of  angles, locations, subject matter, camera rotation.
Ordinary objects have been transformed into interesting photographs
8     9    10

TOTAL       /40

Wednesday 3 May 2017

Digital Manipulation

Over the course of this unit we have been working with digital manipulation techniques. This topic can be quite controversial. Some people believe we should not alter images becuase it does not represent reality accurately but others believe it is creative and an form of art. Which side are you on? 

Your task: Read the following article on digital manipulation: Digital Manipulation Article, then Google digital manipulation images to familiarize yourself with examples and the arguments. Answer the following questions on a good ol' piece of paper: This is an opinion-based assignment. There is no "right" answer, I just want to see that you are thinking critically about digital manipulation.

1. What are the arguments for digital manipulation?
2. What are the arguments against digital manipulation?
3. When do you think digital manipulation is acceptable?
4. When do you think digital manipulation is not acceptable?
5. Under what conditions do you believe viewers or readers should be notified that an image has been digitally altered?
6. Is it easy to tell when an image has been digitally enhanced? What are some clues?
7. How does context affect our response to digitally-altered images? For example, would an
unacknowledged, digitally manipulated photograph in the Globe and Mail be more controversial than an altered image used by the National Enquirer?
8. What are the social concerns relating to digital enhancement of photos and images?


Digital Photo Manipulation - Incredible Examples
Josh Sommers "Desperation"

Photoshop and Digital Darkroom Techniques

Your task: Using the Photoshop techniques introduced previously, enhance some of your weaker photos. You will post a before and after image for 3 photographs and write a description of what Photoshop techniques you used to improve it and why.

Step #1: Choose 3 photographs from your photograph collection (photographs YOU have taken) that would benefit from the following techniques: cropping, more contrast in colour or values, sharpening, need the intensity of shadows, highlight and midtones adjusted, red eye eliminated, spot healing, etc.  If you are not sure whether they need any of these adjustments then just choose any 3 photographs to work with.

Step #2: Open one image at a time in Photoshop and explore the different techniques from the handout - some photographs will need several of the techniques for enhancement, others will only need 2 or 3. The more you explore the techniques and understand what they can be used for the better your portfolio of photographs will become moving forward so explore and ask questions!

Step #3: Post a before and after image for all 3 enhanced photographs on you blog. For each enhanced photograph describe the techniques you used for enhancement and how they changed the photograph.  

You will be graded out of 10 on the following success criteria:
Criteria
Level 1
Level 2
Level 3
Level 4
-Blog post is titled
-3 before and after photographs are posted
-descriptions of the techniques used for enhancement
-enhanced photographs show exploration and experimenting
-enhanced photographs are revised to full completion
Limited and/or parts are missing


5     5.5
Somewhat and/or parts are missing


6     6.5
Good work.


7     7.5
Strong and advanced.


8    9    10

Monday 24 April 2017

Aperture

We've been slowly moving away from "taking photographs" to "making photographs, what do I mean by this?

Moving from automatic settings to manual settings in order to create the photograph you want.
Together, shutter speed, aperture and ISO are called "the Exposure Triangle" and each affect the final photograph. You can choose to set only one of these at a time in different camera modes: "Aperture Priority Mode", "Shutter Priority Mode" and "Manual".
Exposure Triangle YouTube Video

What is aperture?

lens-aperture
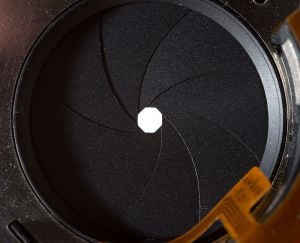
The aperture refers to the size of the opening in the lens through which the light enters the camera. The size of this opening can be adjusted and the aperture size is measured in f-stops. The image on the right shows you exactly what the aperture on a lens looks like.
When you change the f-stop value, you change the size of the opening. Here’s the weird thing though. The higher the f-stop, the smaller the opening.
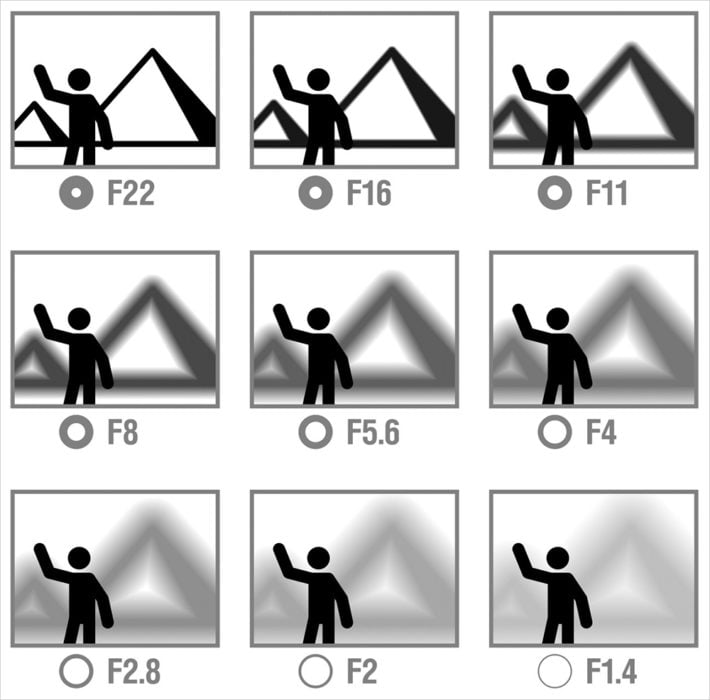
Take a look at the chart below to see what different apertures look like at different f-stops. On the far left, you can see that setting an aperture of f16 will result in a small opening. Choosing an aperture of f1.4 will result in a very wide opening.
aperture-chart

How does your choice of aperture affect the photograph?

The most noticeable effect your choice of aperture has on the photograph is the depth of field. What do we mean by this exactly? In very simple terms, depth of field refers to the amount of the image that is sharp. What does this mean in practice?
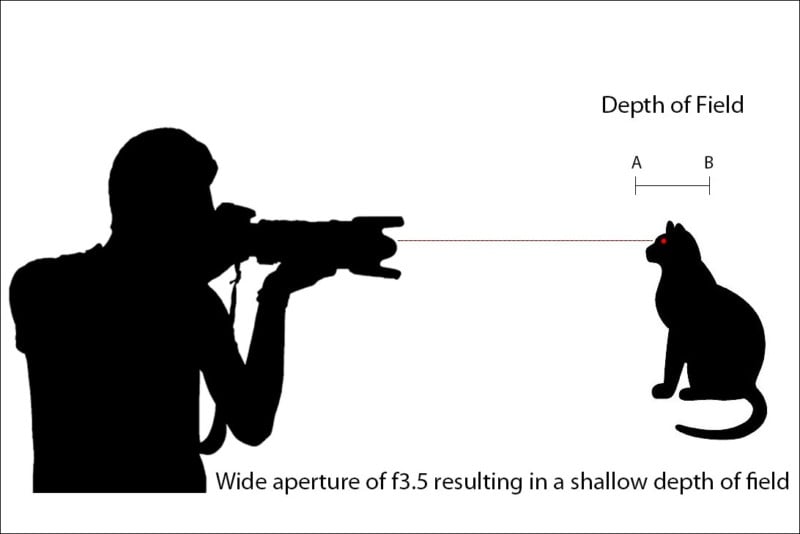
If you use a wide aperture, the depth of field will be shallow. Only part of the image is sharp and the rest will be out of focus or blurred. Look at the picture on the left below. The cat is perfectly sharp but the background is blurred. Using a wide aperture works well for portrait style photographs as it makes the subject of the shot really stand out against the blurred background.
depth-of-field-diagram
In this case, the depth of field extends from about the tip of the cat’s nose to just behind its head, no more than a few centimeters (from point A to point B in the diagram). Anything not in this range, either in front of it or behind will not be sharp. For this shot, I used a wide aperture of f/3.5.
OLYMPUS DIGITAL CAMERA
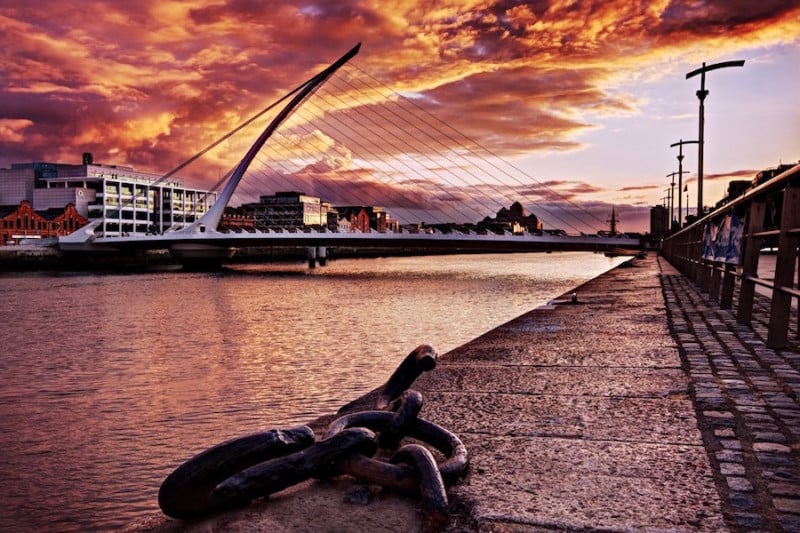
When you use a narrow aperture, the depth of field is deep. When the depth of field is deep, all of the photograph from foreground to background is sharp.
Take a look at the photo below taken in the Dublin Docklands. Everything from the dock cleat in the foreground to the bridge in the background is sharp. In this case the depth of field is several hundred metres, extending right from the foreground to the background of the scene. In this case, I used a narrower aperture of f/11.
samuel-beckett-bridge-at-sunset-dublin
Most of the time, we want to achieve a deep depth of field when shooting landscapes. We want all of the image to be pin sharp.
The mid range apertures (around f/8) are good for shooting handheld for example when doing street photography. You get a good balance between having enough depth of field and fast enough shutter speeds to shoot hand held. We’ll discuss shutter speeds in more detail later.
The chart below gives you a good idea how different apertures will affect the depth of field in your photographs. You can see that as the aperture gets wider, the pyramid in the background becomes more blurred.
aperture-effect-chart-2


Saturday 22 April 2017

Intro to Shutter Speed and Aperture


1. Read the article posted in the SShare titled "Unit 3 - Exposures Basics Note".
2. Watch these videos to help your understanding of Aperture and Shutter Speed:
https://www.youtube.com/watch?v=6_B8pVoANyY
https://www.youtube.com/watch?v=3f5jiFd0ZrI
3. Hand in your notes on the handout "DSLR and Exposure"


These images may also help your understanding of Exposure:

APERTURE


SHUTTER SPEED


4. NOW Post on your blog an example of high f-stop, an example of a low f-stop, an example of a short shutter speed and an example of a long shutter speed. Label the images you find accordingly.


ISO

Tuesday 18 April 2017

Shutter Speed Portfolio

SHUTTER SPEED


Shutter speed settings allow you to regulate how long the shutter is open for. The shutter is a moveable plane that blocks light from reaching the image sensor - think of it as a door that is usually closed but opens briefly to allow light in, then closes again (teacher demo with Canon DSLR). The longer the shutter is open the blurrier your subject will be. The shorter your shutter is open the more frozen in motion your subject will be. See the example diagrams here.


The longer the shutter remains open the more light that enters the camera and the shorter the time the less light that enters the camera. Shutter speeds range from tiny fractions of a second, 1/2000 second for example, to much longer time exposures like a minute or more.

Human motion and water splashing can be frozen around 1/400 or 1/500 second. You can get a good blur at 1/4 second to 1"-2" second.

Your task: Explore and experiment with shutter speed on your own camera or the class Nikon cameras. The more experimenting you do the more familiar you will become with the concept behind shutter speeds. Choose your best 5 slow shutter speed photos and your 5 best fast shutter speed photos. You will need to record the shutter speed for each photograph you take as you will need to list it when you post these photos to your blog. Name this blog post "Shutter Speed Portfolio".

Wednesday 12 April 2017

Photoshop Assignments


Negative Space and Fill the Frame Portfolio

Your task: Demonstrate your understanding of two compositional strategies: Negative Space and Fill the Frame by posting a portfolio of your best 5 of each type of photograph.

Negative Space Examples
Put simply, negative space is the area which surrounds the main subject in your photo (the main subject is known as the "positive space"). For this negative space project, the negative space dominates the photograph, it takes up most of the frame and give the subject tons of space to breathe.


Fill the Frame Examples
The frame refers to the edges of your photograph or the edges of the viewfinder of your camera when you are shooting. The advice to fill the frame means to get in close, to make your subject a significant portion of the final photograph.


RUBRIC
       Criteria
Level 1
Level 2
Level 3
Level 4
Knowledge/Understanding
Quality of photo:
-value range is balanced (not over or underexposed lighting)
-subject is in focus            /10
Limited quality: limited value range and many unfocused subjects

5     5.5
Somewhat good quality: some value range, some subjects are focused

6     6.5
Good quality: most photos have:   full range of values from light to dark, and   subjects are in focus
7     7.5
Great quality: full range of values from dark to light, all subjects are in focus

8     9     10
Thinking/ Inquiry
Fill the Frame/Tight Cropping and Negative Space
-accurate depiction of composition techniques
                    /5
Check the examples again. 2/5 accurately depict fill the frame/ tight cropping and/or 2/5 accurately depict negative space.
2.5
Check the examples again. 3/5 accurately depict fill the frame/ tight cropping and 3/5 accurately depict negative space.


3
Good start! 4/5 accurately depict fill the frame/ tight cropping and 4/5 accurately depict   negative space.


3.5
Nailed it! 5/5 accurately depict fill the frame/ tight cropping and 5/5 accurately depict negative space.


4   4.5    5
Communication
Blog Post:
-each photograph is labeled with the types of composition technique
-each photograph’s subject is identified
-blog post is titled appropriately                       /5
Composition techniques and subjects are rarely labeled accurately. Blog post has appropriate title.
2.5
Composition techniques and subjects are sometimes labeled accurately. Blog post has appropriate title.

3
Composition techniques and subjects are mostly labeled accurately. Blog post has appropriate title.

  
3.5
Composition technique and subject is labeled accurately. Blog post has appropriate title.

4   4.5   5
Application
Exploration and creativity:
-variety of angles, locations, subject matter, camera rotation
-ordinary objects have been transformed into interesting photographs


                                           /10
Limited exploration and creativity: little variety of shots, little variety  angles, locations, subject matter, camera rotation.
Ordinary objects have been transformed into interesting photographs rarely
5     5.5
Some exploration and creativity: some variety  angles, locations, subject matter, camera rotation.
Ordinary objects have been transformed into interesting photographs sometimes.

6    6.5
Good exploration and creativity: a good variety of  angles, locations, subject matter, camera rotation.
Ordinary objects have been transformed into interesting photographs mostly.

7     7.5
Great exploration and highly creative portfolio: variety of  angles, locations, subject matter, camera rotation.
Ordinary objects have been transformed into interesting photographs
8     9    10

TOTAL       /30